 |
ARTICLES |
|
ARTICLES |
 |   |
 |
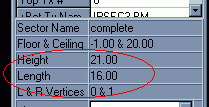
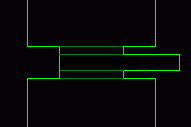
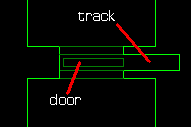
These brief tutorials are mostly intended for WDFUSE users who have an understanding of the basics and a good knowledge of INF. Keep in mind that there's almost always more than one way to achieve a result. The methods I use here are not necessarily the best or easiest ways to handle their respective tasks. Think of these as starting points from which to develop your own personal techniques that are easiest for you. Good luck, and if you have a problem, write me or post your question on the Message boards. Building a Horizontally Sliding DoorI've seen several different ways of performing this task, but this seems to work the best for me. It acts just like a standard door, opening when you nudge it with the space bar, and then sliding back into place after a period of time. To start: create a sector for the track that your door will move on as shown in the picture on the bottom left. Next insert a subsector inside the first, as show in the right picture. Name the two sectors door and track, or whatever you want to name them. Set the floor altitude of door to 0.1 below the ceiling altitude. For example, if the ceiling is at 16, then set the floor to 15.9.
Now its time for the INF part. For door, use this code: seq The angle and 2nd stop might need to be adjusted, depending on how your door is set up. This door will move 15 units to the east when opened, wait 4 seconds, and slide back into place. You may also want to add some Sound lines. At this point, you could simply set the event_mask to 48 (allowing it to be opened when nudged) instead of 0, and the door would appear to work as it is supposed to. There's one problem though, if the player is unfortunate enough to be inside track when the door closes, they will become wedged between the wall and door. As it is now, typing LABUG is the only way to escape. Adding some INF to track will fix this by letting the player use the space bar if they should be trapped. Here's the INF code for track: seq If you'd like, the door can be locked by inserting a Key line. Creating an Animated Floor or Ceiling
You don't see the INF function Texture often enough. When used at an elevator stop, it copies the floor or ceiling texture from one sector to that elevator. Here's the syntax: TEXTURE [stop number] [flag] [donor sector] Stop number is the same as in a Message or Page command. Donor is the name of the sector that supplies the new texture. Flag is something different, however. If the flag is a number, it will use the donor's floor. If it is the letter "c", the ceiling will be used. I assume "c" stands for "C-eiling". With that taken care of, here's what you need to do to pull off the effect in the picture. You need three sectors, and one INF definition. The sector with the animated floor will be called animated, and the two donors are light and no_light. The donors don't have to be dummy sectors, either. They can be from anywhere else in the level, as long as the floor textures of the donors are the correct ones. Here's the INF for animated: seq At the 2 different stops in this elevator, you can see the Texture lines. The stops are @0, so the floor doesn't actually move up and down, but at stop 1 the floor texture of light becomes the floor texture of animated. If the line said: texture: 1 c light Then the ceiling of light would be copied due to the letter "c" as the flag. [Update: March 2000] This effect does not seem to work will slave sectors. That means you'll have to create a new INF definition for each and every sector that you want to switch textures on. Centering a Texture on a Wall
Here's a tip that might interest some out there. To position a texture in the middle of a wall, as shown above, you can use this equation: So in the example in the picture, the texture is size 16 X 16.
So put a 2 in the box labeled "Mid Tx X Off" on the wall editor window. The texture is now horizontally centered on the wall. This will also work when used to center textures vertically. Just replace the "widths" with the heights in the equation, and change the Y offset instead of X. Changing the Background MusicThe music files for all the 14 levels can be found in the file SOUNDS.GOB, which is located in your main DF directory, usually C:\dark, or on the CD. There are 2 GMD music files for each level called STALK-*.GMD and FIGHT-*.GMD. The * corresponds to the level number. For instance, level 1 has STALK-01.GMD and FIGHT-01.GMD, level 12 has STALK-12.GMD, etc. Now choose the level you want to use the music of. Let's say you want to take it from the third level, SEWERS. Extract the files STALK-03.GMD and FIGHT-03.GMD from SOUNDS.GOB, and rename them to STALK-01.GMD and FIGHT-01.GMD. Place the two new files in your level's project directory. That's it! Offsetting the Floor/Ceiling
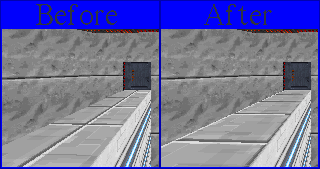
The grid can be used for more than just lining up walls and vertexes. It is also very useful when aligning floors and ceilings as shown in the Before/After picture above.
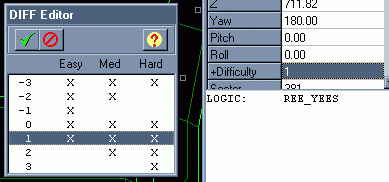
Set the grid size to 8. The squares created by the grid are the default position of the floor and ceiling textures. Using the squares as a base, you can now change the X and Z offsets of the floor/ceiling to line everything up as you want it. Try experimenting with different numbers to get a feel for how it works. Enemies and Difficulty SettingsFor many different reasons, a lot of level authors forsake the use of difficulty settings. Here's a tip on how to easily populate your level. The first thing to do is design the enemy placement as it will appear on the "Medium" setting. Leave the Difficulty setting for every enemy and item object you add at the default value: (1)Easy/Medium/Hard.
If you test your level now, you will notice that all 3 of the difficulty settings are the same, of course. Keep testing until you are happy with the amount of enemies for "Medium". Now its time to remove enemies for the "Easy" setting and add more for "Hard". This is simple; all you have to do is select a number of enemies that are already on the map (you decide how many of them) and change their difficulty settings from (1)Easy/Medium/Hard to (2)Medium/Hard. Those enemies will no longer appear when the level is played on "Easy", making it, well, easier of course. For "Hard" you must insert new enemies in and give them a Difficulty setting of (3)Hard. Items can be done just as easily by doing the opposite of what you did for the enemies. Use the (-2)Easy/Medium setting to first remove items for "Hard", then make more and give them a setting of (-1)Easy to add items to "Easy". At this point, you'll probably have to go back and make numerous adjustments and alterations to your objects before its just right. I suggest not putting enemies in until after most, or all, of the architecture is in place. |
![([width of the texture] divided by 2) - ([length of the wall] divided by 2) = the X offset of the wall](f2centr2.gif)